
✋ Heads up! Before you begin, make sure you have downloaded Passare Mobile.
Jump ahead to
💡 Using a shared device? Set up passcodes to provide your staff easy access!
Track bodies
Tracking those in your care starts the moment you pick up the body. Passare Mobile lets you create the case and log tracking details from anywhere.
💡 Use barcode tracking? As a convenience to you, we sell QR code wristbands. For questions or to place an order, contact us at support@passare.com or (800) 692-5111.
Add a location
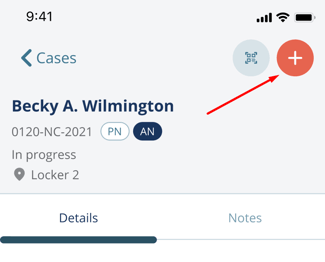
If you are adding a case, click the plus icon and select Case. Fill in case details like case type, branch, and name.

If you need to update the location for an existing case, open the case you need to track, tap the plus icon, then select Location.

Next, fill out the following Tracking fields.
⚠️ Missing some buttons? Tracking is determined by roles and permissions. For help, reach out to us at support@passare.com or (800) 692-5111.
Assign a location
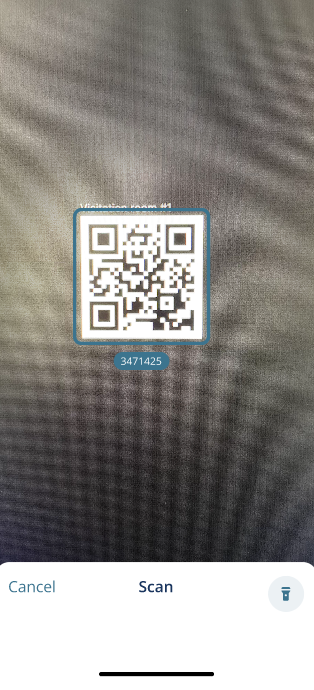
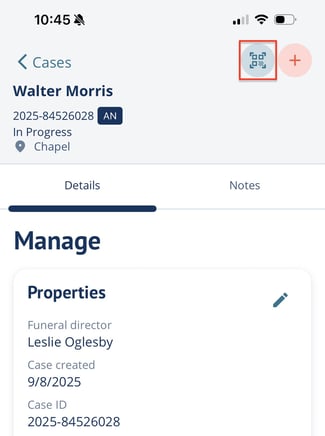
To assign a location to the case, use the scanner tool to scan a location code or select the arrow to view your list of saved locations.
By clicking the arrow, you can search your list or find a location using the GPS tool.
💡Don't have any saved locations? Click here to learn about location management.

Use the GPS tool to select your current location, drop a pin, or choose from nearby options. If the location doesn’t have a standard address, long press on the map to drop a pin and save the exact coordinates.

Assign a Decedent ID
💡Need to add a Decedent ID without changing the Location? Open the barcode scanner from within the case to scan and add the new ID.
Attach a tracking band to the body's ankle or wrist. Then, use the scanner tool to scan the code in the Decedent ID field. You can also manually enter the Decedent ID by typing in the field.

📸 Taking pictures in the dark? Use the flashlight tool to light up your space!
If a body has been assigned more than one Decedent ID, the most recent ID will appear first on the Track page. Tap the decedent's name to view every decedent ID associated with the body. 

🔍 Use the search bar on the Cases page to find cases by Decedent ID.
Add photos
Next, upload photos of the decedent to keep on record using the camera icon.
You will have the option to take a new photo or choose from your library.
Once photos are uploaded, thumbnails will display in the Photos section. Click on a thumbnail to view in full screen, and swipe to see all photos uploaded here.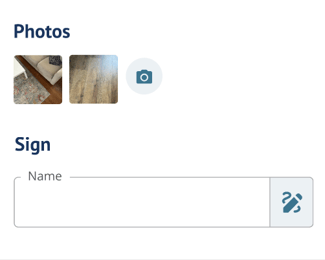
Sign
Lastly, sign for the tracking activity you've logged. While this step is not required, it does help authenticate the actions recorded in the app.
To sign, type in your name, then click the pen icon.
Draw your signature in the box and click Done. You can also clear the signature using the redo button.
For quick access, the current location of a body is displayed on the Cases page.
Track items
Next, you can log the decedent's personal items. Inside a case, tap the plus icon and select Item.

Enter the name of the item.
💡TIP: If adding items in bulk, give the item a generic name (e.g., Clothing) and list the items in the Description field.

Log the location of the item(s) by selecting from your list or scanning the location's code.

Type in the Item ID, or scan the barcode associated with the item.

Assign an action to these items by clicking the arrow on that field.

You will be prompted to select whether these items should remain with the decedent, return to the family, be disposed of, donated, or other.
Make a selection and click Done.
Add any additional information staff should know when handling the items in the Description field.

Select the camera icon to take a picture of items or choose from your library.


Once you have uploaded photos, you can tap on the thumbnail to view them in full-screen mode.
Here, you can toggle between multiple photos and delete any, if needed.
Use the Signed by field to type your name, then tap the pencil icon to draw your signature.

Use the toggle next to Lock item to prevent the item from being updated or edited.

Click Done to save.
Locked items will show a lock icon when viewing the item details.

⚠️IMPORTANT! You will be unable to edit or update items after they are locked. Make sure this is the final step of the item's chain of custody.
To update the item location or delete an item, find it on the Track page within the case.
Select the item, then tap the pencil icon.

To edit item details, update the necessary fields and click Done.

To delete an item, click Delete at the bottom of the entry.
Then, confirm the deletion.
View tracking history
You can view the tracking history of each decedent and their items. The history will show you the detailed chain of custody.
If you use barcode tracking, open the case and scan the barcode to open the Track page.
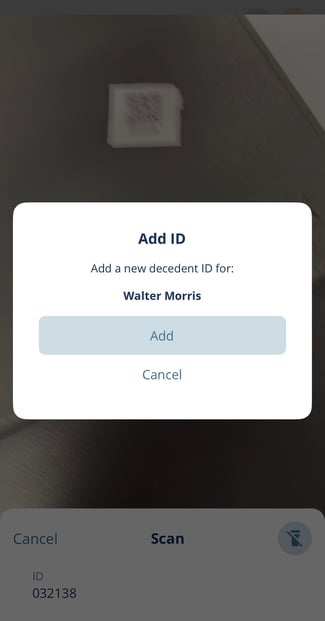
If you scan a code that isn’t already assigned to the decedent, tap Add to create a new Decedent ID with that code. After adding it, you’ll be taken to the Track page.
From the Track page, select the decedent or item name that you want to view.
Select Show history to view the details of this decedent or item.
History will show users, timestamps, descriptions, and photos of previous activity.
You can also view history on the Tracking page in Passare.
Click Print location events history to print or save a copy of the decedent’s tracking history.

Void a location
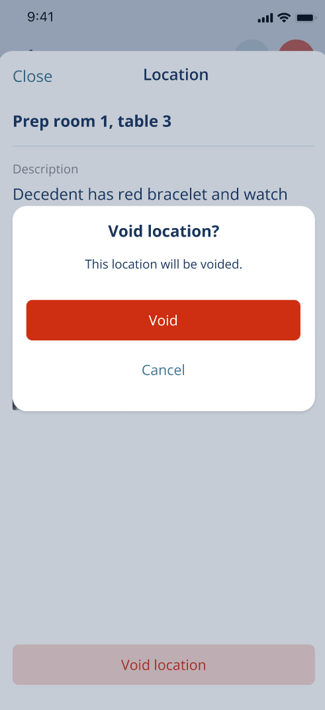
To void a location, click on the location entry in History.
Select Void location and confirm.
Voided locations will be indicated by red text and strikethroughs.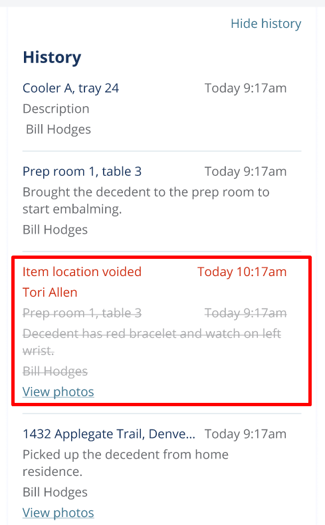
Roles & Permissions
You can customize what your staff see in the mobile app on the Role manager page under the Parent organization settings.
Select the role you want, then scroll down to find the Mobile app (beta) settings. Here you can choose which areas of the mobile app a person with this role has access to. Staff will only see areas of the mobile app you’ve given permission. Other areas of the app will not be visible.
Need More Information?
- Getting started with Mobile Tracking
- Set up tracking locations in Passare mobile
- Create a case in Passare mobile
Need Help? Email us at support@passare.com or call (800) 692-5111!