
Jump to:
- Roles & Settings
- Invoices page, Invoices summary, & invoice status
- Download, search, and sort invoices
- Filter invoices
- Create an invoice or draft
Financial features
Need help with Invoices setup? Please complete this form to request help setting up Pet & Trade Invoicing with Passare's support team.
Or contact Passare support at support@passare.com or by calling (800) 692-5111.
Invoicing roles & settings
Go to Admin > Organization > Roles
Open any user Role to grant Invoicing permissions

Under System > Financials you can grant user role permissions to access:
- Invoices (all), Create invoices, Pay invoices, or Void invoices

Make selections for this Role's permissions > Save
Configure Invoice PDF columns in Settings
Configure invoice PDF columns for Pet & Trade
Go to Admin > Financials > Invoices
For Pet and Trade, the following columns are already auto-checked:
- Charges
- Date
- Subtotal/Tax
- Owner (Pet only)
| Trade columns | Pet columns |
 |
 |
Uncheck any columns you do not want to show on the PDF > Save
You will then see the columns you selected on your Invoice PDF
Pet cases PDF:

These columns will then be reflected on your Invoice PDF
Trade cases PDF:

Invoices Page
Go to Financials > Invoices
This takes you to the Invoices page

Here, you can:
- Create, view, and download invoices
- See your Invoices summary
- Number of Open invoices
- Number of Past due invoices
- Balance due
- Number of Uninvoiced cases

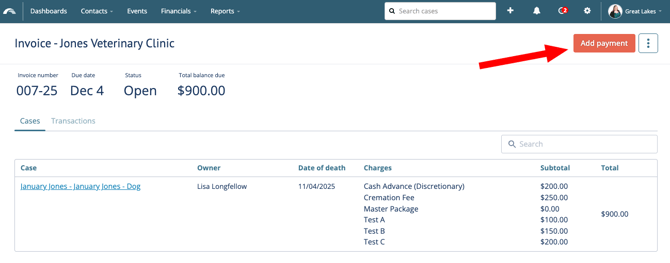
Invoice status
- Open - An invoice has been created and has an outstanding balance.
- Closed - The invoice was created, sent, and has now been paid in full.
- Past due - the due date on an invoice has passed.
- Voided - When an invoice is voided, the cases and charges on that invoice are now available to be included on a new draft or invoice.
Download invoices
Select invoice(s) you'd like to download

Actions > Download

You can also download invoices directly from an open invoice > ellipses > Download

Search and Sort invoices
To search invoices, go to the Invoices page
Start typing in the Search box > View search results

To sort invoices, click any of the column headers to sort A-Z or sort Z-A
Such as, by Payer (shown below)

Filter invoices
You can filter invoices in two places: from the full Invoices list or while creating invoices.
To filter all invoices, go to Invoices > Filter > you'll see the filter drawer appear
Add your filter selections and > Add filter or Apply

Filter all invoices
Choose whether you're filtering All or Any
- All - means every single filter must be true for the cases to show up
- Any - means any of the filters can be true for the case to show up

To filter, select a field > a condition > select or enter a value
You can filter by the following fields: Balance, branch, due date, invoice date, status, payer, or type

Once you've made your selection > Add filter

Add additional filters (as needed) > Apply

You will see a confirmation message and filter results when filters are applied successfully

Filter while creating invoices
From the Create invoices page > select Payer, Branch, invoice date, due date > Filter

Choose whether you're filtering All or Any
-
All - means every single filter must be true for the cases to show up
-
Any - means any of the filters can be true for the case to show up

Next, select your field > select a condition > and a value
You can filter by the following fields: Case created date, case status, case tags, client service type, contract date, date of death, disposition date, disposition type, invoice signing date (first, last, or any)

Once you've made your selection > Add filter

Add additional filters (as needed) > Apply

You will see a confirmation message and filter results when filters are applied successfully

Create an invoice
To create an invoice, go to Financials > Invoices

From the Invoices page > Create invoice

Complete the invoice fields:
- Payer
- Branch
- Invoice date
- Due date
- Memo
- ☑️ Check all cases to include on the invoice
Only cases that are tied to the selected payer that have been signed at least once and cases that have an outstanding balance will be available to include on an invoice. If you think any cases are missing, check whether they have been signed.
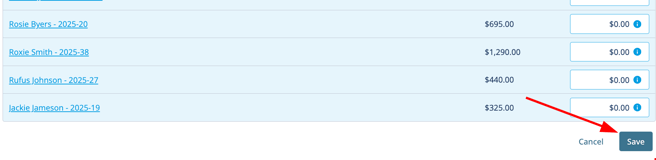
Select cases to add to your invoice > Add > Create

- The "
 " icon will appear when a case has unsigned changes
 - You can include a case with unsigned changes, but please note that charges must go on a separate invoice.
A confirmation pop-up will prompt you to proceed with creating an invoice with unsigned cases.
To proceed, confirm you'd like to > Create

A green confirmation message will appear once the invoice has been created successfully.

Save a Draft
You can choose to save a draft instead 
From the create invoice screen, simply choose cases you plan to invoice later > Add > Save draft

A green confirmation pop-up appears once the draft is saved.

Delete invoice drafts
From the Invoices page > open an existing invoice > Delete

Confirm you'd like to Delete draft on the pop-up message > Delete

Pay, edit, delete, or void an invoice
Pay Invoices
To add a Payment, go to Financials > Invoices
Open an invoice > Add payment
Next, Select a payment option:
- ACH, Cash, Card, or Check

Complete all remaining payment details:
Payment amount*- Payment date*
- Payer*
- Email receipt:
- Memo
- Additional details for certain Payment Types:
- ACH - Reference number
- Check - Check number
-
- Card - Card type, or Card type: Other
When all payment details have been entered > Pay

To send a receipt for a new Payment
-
Open an invoice > add Payment > edit or add new email recipients
-
Click email recipient to:
-
Include or remove the Payer email, simply check or uncheck it.
-
Edit or add a custom email, type custom email > Enter to add custom recipient.
-
-

-
-
And Pay
-

The Email receipt field auto-fills with the Payer email from the Rolodex contact
Every address listed in the Email receipt field (Rolodex and custom) will receive the receipt.

Custom email addresses added here are saved only for this payment on this invoice.
Note: Old payments emails do not change. They keep the email addresses that were set at the time.
A green confirmation appears when the payment's been saved.

NOTE: We do not currently have a way to automate, track, or send automatic reminders once an invoice is Past due.
Edit payments
To edit payments, start from Invoices > open an invoice
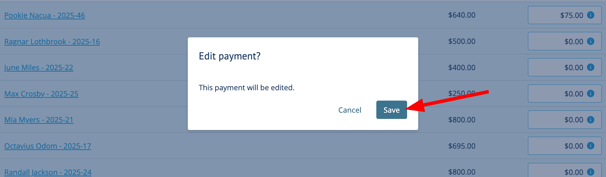
Go to the Transactions tab > open the payment actions list > Edit

Edit payment details: payment method, payment amount, payment date, receipt number, and email receipt.
Once edits have been made, be sure to > Save.
And confirm the edited pay details on the pop-up message > Save
Delete payments
Go to Invoices > Transactions tab > open the ellipses menu > Delete

Confirm to delete payment in the confirmation pop-up message > Delete

Void invoices
From the Invoices page > select an invoice or draft > Void > confirm Void

If you need to correct a charge, you do so by creating a new invoice
If you remove an item from a signed case, be sure to re-sign the case after removing it.
You can fix this in two ways:
1. Update the case
-
Make your changes > Re-sign the case > Save
2. Update the invoice
Choose one option:
-
-
Void the old invoice > create a new invoice > add the updated case, or
-
Create or edit a draft invoice > include the updated case > Save
-
Review and save
-
-
Check the Charges column on the Cases tab > Add any needed cases > Save
-
View invoice history and transaction history
If you need to navigate back, press Backspace or select the correct page from the top‑left navigation link.

To see detailed history > open either the invoice history tab or transaction history tab

Open an invoice > see more options, open the ellipses menu > History

You can then view the history details

Batch actions
Once the feature is turned on, you'll see invoice payments as an option to add to your Batch Deposits
Go to Financials > Deposits > Create Batch Deposit
Add any invoice payments you'd like to include on your Batch Deposit > Save!


Goods and Services page
On the Goods & Services page, there's a new Invoice column located in the Sign case section.
Invoice links tied to this case are listed in the new Invoice column.
Click an invoice link to be rerouted to view the invoice and invoice details.

Payments & Adjustments page
On the Payments & Adjustments page, you now see Invoice links
Invoice links are tied to their payments, and adjustments for this case will be shown and linked under Details.
Simply click any invoice link to be rerouted to the invoice and view any associated transaction history or activity.

Need help? Email support@passare.com or call (800) 692-5111.