
Want this feature turned on? Email us at support@passare.com or call (800) 692-5111.
Jump ahead to
- Manage access
- Notification preferences
- Send a message
- Statuses
- Add collaborators to messages
- Lock messages
- Message history
Manage access
Access for this feature is assigned from the Roles page.
Click the Settings icon.

Messages must be assigned from the parent organization.
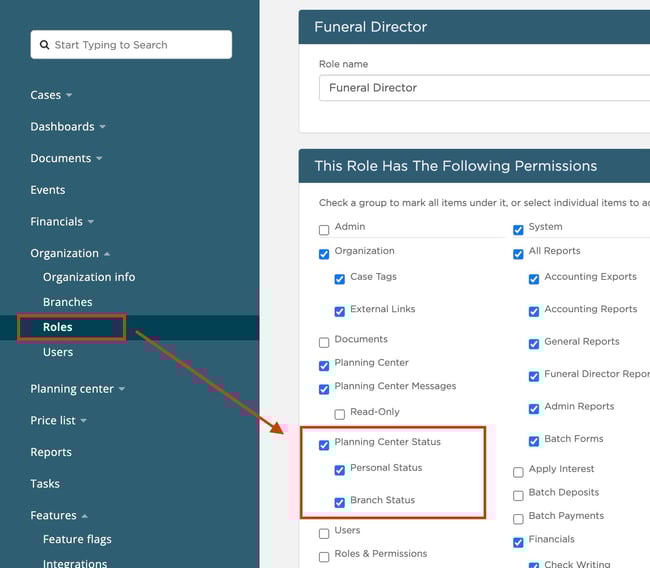
Click Roles under Organization, then select which roles you'd like to give access to messages.
Once you've selected a role, check the box next to Planning Center Messages.
Read-Only will give your staff access to view all messages, but they won't be able to send any messages in the Planning Center.

Notification preferences
Customize your notification preferences to get notified when a new message is received.
Click the bell icon in the navigation menu, then click the gear icon.
Use the toggle to select how you want to be notified when new messages are received. 
Save.
Send a message
The Messages section will now appear on the Planning Center page of a case. This card will be blank until the first message is sent.

Type your message in the text field in the Messages card. Click Send.
Click Send again to confirm you want to send the message to the family.
Families with access to Planning Center will see your messages on their Dashboard.
Families can reply directly to you and your staff in the Planning Center.-gif.gif?width=650&height=423&name=send%20a%20message%20(family)-gif.gif)
View the message from the family on the Planning Center page in the case.
Statuses
Create a status that appears to families when they message you.
First, determine which users can create a status.
From Admin settings > Roles, select which role you'd like to give access to.
Check the box for Planning Center Status. You can also grant access for the following:
- Personal status allows for users to create a status for their own account.
- Branch status allows for users to create a branch-wide status.
Personal status
A personal status can be set under the user’s profile.
Go to your Profile to set a personal status. 
For roles with Planning Center Status enabled, a new section called Personal Status will be visible.
Toggle on Show status in Planning Center messages and schedule when your status message should be displayed. 
Only one personal status can be active at a time.
When a personal status is set, the status owner can designate another staff member with access to the feature to be notified of incoming messages under Notify.
Once status information has been added, click Save.
Branch status
A branch status can be set on the Messages page under Planning Center settings.
A table will show the status name, the branch it applies to, and the dates the status will be active.
When active, branch status will apply to all staff members of the branch the status is applied. Branch status will override personal statuses set at the same time.
To add a new branch status, click Add under the Branch status section.
Use the first dropdown to select the branch(es) this status applies to.
Type in the status name, date/time, and message.

Click save.
You will see a message that the branch status will override personal status. Click Override to confirm.
Add collaborators to messages
Branch collaborators
Determine which users receive notifications about messages for a specific branch's cases. Branch collaborators will have access to view and reply to all messages.
Go to Settings > Planning Center > Messages.
Click Add from the Collaborators section.

Use the dropdowns to select the location and its collaborators.
Case collaborators
Users can also be added to receive message notifications on a case-specific basis.
From a case, navigate to the Planning Center page.
In the Messages section, click the plus icon.
A modal will appear to add a collaborator.
Type the name of the person you want to add in the search bar.
Once the name is entered, click Add. 
Lock Messages
Lock messages to prevent new messages from being exchanged.
Messages can be locked manually or automatically from the case sidebar.
- To manually lock the chat, check Messages from case sidebar > Planning Center.
- To automatically lock the chat, add a date to the Lock all on field. This will lock all sections of the Planning Center on that specific date.

When Messages are locked, a closed status will appear for the conversation.
To edit this message, click Edit next to the status text.
Update the text and click Save.

Need more information?
- Send Planning Center invitations
- Getting started with Planning Center
- Manage Planning Center notifications
Need help? Email us at support@passare.com or call (800) 692-5111.