
Jump to:
✋ Inventory requires setup.
Email us at support@passare.com or call (800) 692-5111 to get started!
After Support completes your Inventory setup, you must configure locations and items. 👇
Configure inventory locations and items
Specify which places your inventory will be stored (Funeral Home, Warehouse, Showroom, etc.) and indicate which price list items will be inventoried.
Setup inventory locations
First, go to Settings > Price list > Inventory.
Scroll down to Inventory Locations and click Add New.
Add location name and details, then click Add Location.
If there are multiple organizations, this will need to be done on each child organization and the parent organization.

Indicate which items are inventoried
Go to Settings > Price list > Price list items.
Select an item, then scroll down to Inventory.
Turn On the toggled labelled Item is inventoried.
Indicate whether Passare should:
- Require Serial Numbers for this item
- Auto Generate Serial Numbers
- Require Item to be Pulled from Inventory

You can NOT disable this setting once inventory items are marked as On Hand, Assigned, or Pending.
Set the Minimum Quantity to determine when "low inventory" notifications are sent.
Manage inventory
Go to Financials > Inventory.
From the Inventory page, you can:
- Add Inventory
- Edit Inventory
- Filter Inventory
- Transfer/Remove Inventory
- View Pending Review Inventory
We'll take a deeper dive into each one!
First, configure your columns by selecting the ![]() icon.
icon.

Drag and drop the columns in your preferred order.
Select Save.
Add Inventory
Select Add Inventory from the Inventory page.
The following field dropdowns are populated from info in the price list.
- Item Name
- Location
- Cost
- Minimum Quantity
- Category

The following fields on Add Inventory are required:
- Ordered From
- Item Name
- Date Added - *will default to the current date
- Location
- Quantity

If an item has been ordered but not delivered, use the Pending delivery checkbox. The Date added field will be greyed when Pending delivery is checked.

This will add the item to the Delivery pending tab on the Inventory page.

Once the item is received, select it from this tab and update the Date added field to add it to your inventory.
Next, click Save. Repeat the above steps to add additional inventory items.
Edit Inventory
From the Inventory page, click Edit Inventory.

Change/update fields as needed and Save.
Item name, category, and status fields cannot be edited.
Filter Inventory
Utilize the Filter Inventory button to customize your inventory views.
Filter by the following items:
- Item Name
- Location
- Category
- Status
- Date Added
Select Show in New Tab to save the filters for future use.
Save New Tab name.

If the user has access to multiple organizations, the saved filter tab will only be visible in the organization in which the filter was created.
Remove/Transfer Inventory
If you select the ![]() icon on the Inventory page, the Remove Inventory page will open.
icon on the Inventory page, the Remove Inventory page will open.
You'll be required to fill out Date Removed, Removal Reason and Sold/Transferred To fields.
Select Remove.
You will only be able to see the 'Transferred to' field if the removal reason is 'Transferred to Funeral Home.'
View Pending Review Inventory
When inventory is transferred from one organization to another, the inventoried item will show on the Pending Review tab with a Pending Status.
It will no longer appear in the All Inventory tab.
This tab is only visible when 'Enable inventory transfers between organizations' is turned on under Admin > Price list > Inventory.
Click Cancel Transfer to place the inventory item back in the originating organization's inventory.
The receiving organization will have a Review button on their Pending Review tab.
The Review button will bring up a Remove Inventory list where the following fields can be edited:
- Item Name
- Location
- Cost
- Serial Number
- Notes
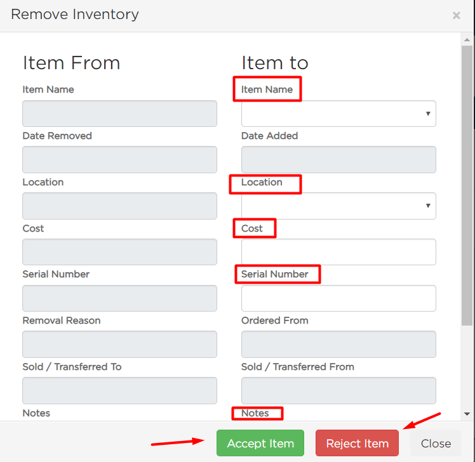
The receiving organization can choose to Accept or Reject the inventory.
When the inventory is Accepted, the inventory is removed from the Pending Review tab and moved to the All Inventory tab of the receiving organization.
If the item is Rejected, the inventory is removed from the Pending Review tab of the receiving organization and placed back in the All Inventory tab of the sending organization.
Transfer Notifications
You can receive notifications related to inventory transfers by turning on Notifications.
To do this, go to Admin > Price List > Inventory.
Select Yes under the Enable inventory transfers between organizations setting.
You'll receive three different types of notifications:
- Incoming Inventory
- Accepted Inventory
- Rejected Inventory
When you receive the notification, click on it to review inventory.
If you accept the item, you'll be required to fill out Item name and Location fields.
Cost and Serial Number are optional fields.
Select Accept Item.
If the receiving organization clicks Reject Item, the sending organization will receive a notification, and the item will be removed from the Pending tab of the receiving organization.
Need More Information?
Need Help? Email us at support@passare.com or call (800) 692-5111!