
✋ Heads up! Before you begin, make sure you have downloaded the Passare mobile app.
With Passare's mobile tracking, you can easily record and monitor the whereabouts of everything in your care. From bodies to personal items, all tracking activity starts with its locations.
To begin, tap your profile in the top-left corner, then tap Tracking.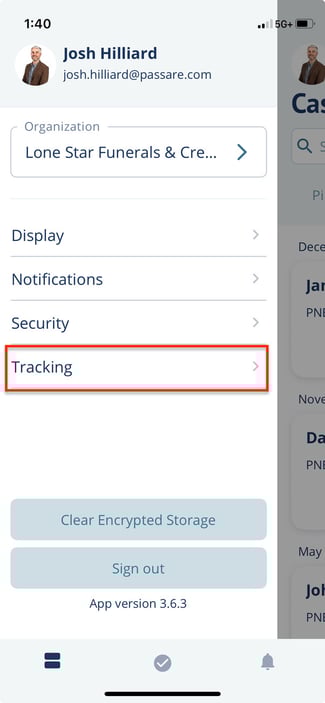
⚠️ Don't see this page? Make sure Chain of Custody under Mobile app (beta) is enabled in roles and permissions. For help, contact us at support@passare.com or (800) 692-5111.
To add a location, click the plus icon and select Location.
Add in the location name, branch, capacity and description.
If you use QR codes in your mobile tracking, you can type or scan the code using the scanning tool.
Enter the capacity size for the location.
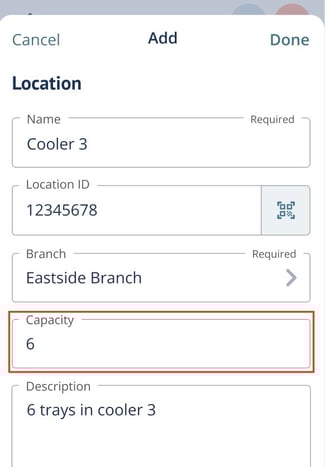
If capacity is set, you will receive an alert if the location you are trying to move a decedent or item is at its maximum capacity.

If the capacity field is left blank or set to 0, there will be no limit on the number of decedents or items that can be at the location.
When you are finished, click Done.
💭 Keep in mind... Locations in the same branch cannot share a name or ID.
💡 If you use the same location for multiple branches, you must add the location to each individual branch.
Edit or delete a location
To edit or delete a location, tap on the location from your list and select the pencil icon.

To edit, make necessary changes and click Done.
To delete, click Delete at the bottom of the screen.
If you are deleting, you will be prompted to confirm. Click Delete to finish.
That's it! Now that your locations are set up, you can start tracking decedent chain of custody in Passare mobile.
Need more information?
- Getting started with Mobile Tracking
- Comparison between Decedent Tracking & Passare mobile app (beta)
Need help? Email us at support@passare.com or call (800) 692-5111!