Create a custom document
Create and upload your funeral home's forms to be pre-filled by Passare data.
🤚 You'll need access to customize this feature. For help with roles & permissions, contact your admin or our team at support@passare.com or 1-800-692-5111.
Jump ahead to
Prepare the document
Passare accepts two document types, Word and PDF. To begin, create or open the form to edit on your computer.
Note: Adobe Acrobat Pro subscription is required to create and prepare PDFs.
Word
On your document, add a tag anywhere you'd like case information to populate.
These tags must use the format, [%TAG%]. Type out unique tag names between the % signs with no spaces.
Be sure your tag names are specific to the information that belongs there. You will reference this name later on when mapping Passare data to it.
If you would like the output data to be stylized, apply that style (bold, italics, etc.) to the tag itself.
- For example, [%TAG%]
Tags can be used in tables (Insert > Table) for fixed formatting or added in a paragraph of text.
Tagging a Word document for mathematic functions or logos is possible, but fairly complicated. Contact our Passare Support for help with those.
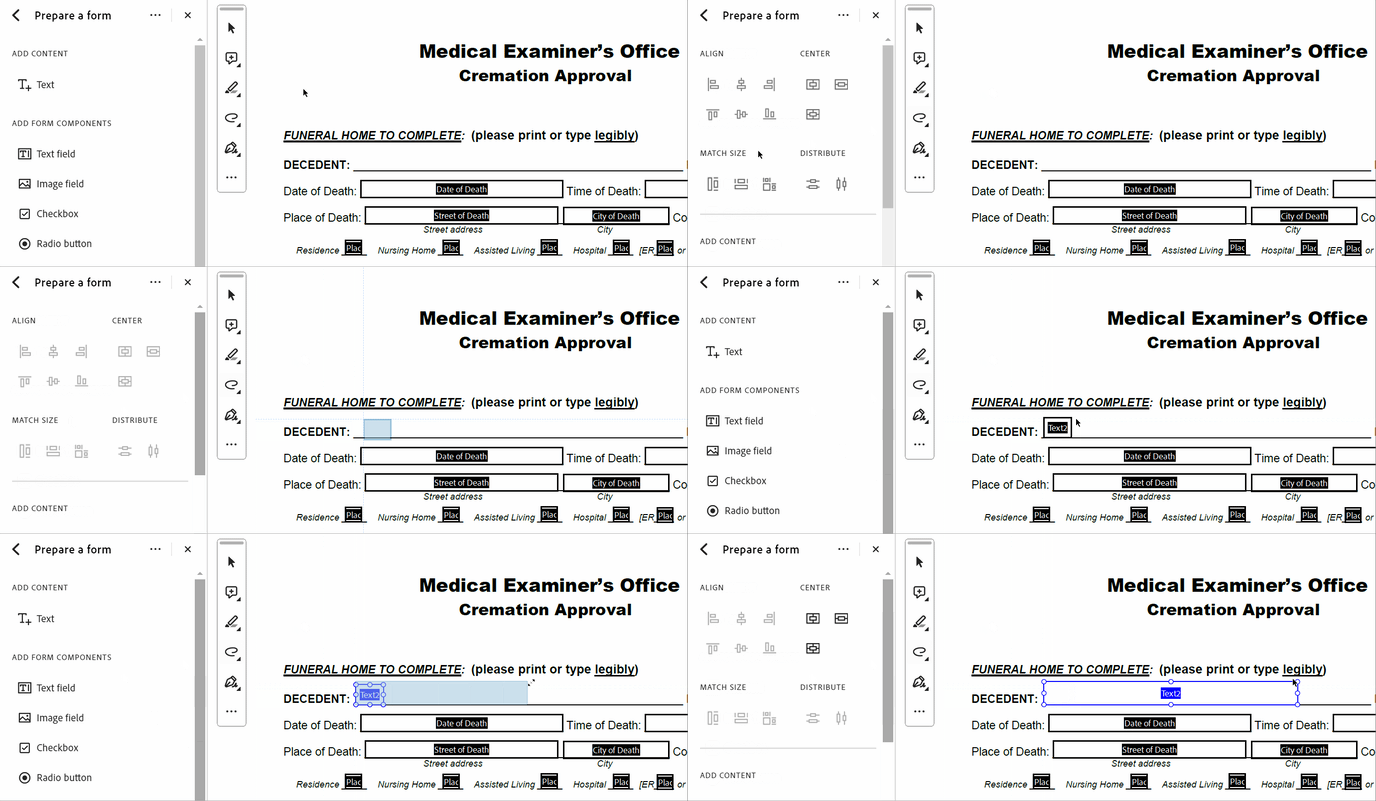
To tag a PDF, start from the Prepare a form tool under the All tools tab.

Once you click this tool, you may see textboxes appear with tags already in them.
Tags in PDF do not require the same format as Word tags and appear highlighted in a textbox.

To add a tag, select Text field from the left menu and click to place it.
The text size will adjust based on the height of the textbox, so resize the box to be just a little taller than nearby text. You'll also want to make sure it's long enough to hold plenty of text!

Double click the text field to edit the tag name, font, and more.

Remember, it doesn't matter what you name the tag, as long as it helps you map it later!
Tagging PDF for checkboxes is possible, but fairly complicated. Contact our support team for help with that.
Upload the file
Once you've prepared your document, click the Admin icon and go to Documents > Templates.


Click Add New Template and select Template.

Name and browse to upload the file. Then click Create.

Map and publish
Next, you'll tie Passare mappings to the tags you created. This tells Passare what information to output for each tag.
Once the form is uploaded, scroll down to see your tag names listed.
Next to each tag, search and select the Passare mapping from the dropdown.

Notice that there may be different formats for the same information. If you're having trouble distinguishing the best one for your document, contact our team for help.
Once you've mapped your form, select which case types and template category it belongs to.
Then check the Published checkbox. Don't forget to save!

To check that your form is working properly, select a filled-out case under the Template preview section.
Then, click Download template preview to see this document with real case information.

Troubleshooting
Q: I tried to Upload a new Word form and I got an error.
A: Make sure you are using .docx, not .doc files.
Q: I printed a preview and I see a tag in my form.
A: The system only recognizes proper tag format: check that there are no spaces between characters and no special characters inside the tag.
Q: I uploaded a PDF and can’t find one or more of the fields I added.
A: Avoid punctuation and special characters when naming fields in PDF files.
Q: I mapped my form but nothing shows up in my template preview.
A: Double check that the case has information in that field. If it does, and your form still isn't populating, contact our Support team for assistance.
Need more information?
Need help? Email us at support@passare.com or call 1-800-692-5111.
