
Jump ahead to
- Decedent information
- Preparation status
- Preparation due dates
- Transfer
- Embalming
- Dressing
- Appearance
- Cremation
- Tracking
- Notes
- Checklists
Decedent information
In the case menu, there will be a section called Care Center.
Select any page in this section to access the Care Center.

Preparation status
Once in the Care Center, add Preparation details like due date, time, and status.
Use the Preparation status dropdown to track the body's progress. Default statuses include Not started, In progress, and Complete.

Learn more about customizing preparation status.
You can also view and update the case's Preparation status from the case sidebar.

Preparation Due dates
To track your prep deadlines, create multiple Preparation Due dates. These can be made in the Care Center or from an Event.
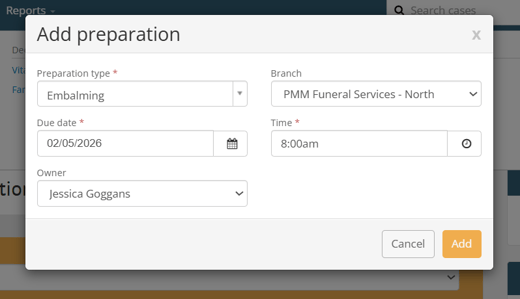
To create a Preparation Due date, click Add.

Type out or select the Preparation type.
Fill out details like branch, date, time, and owner (who is responsible for preparation).
Then, click Add.
The new due date will appear chronologically in the Care Center.

Continue this process for any Care Center deadline you need to track!
Users with Care Center access will be notified of newly added or edited due dates.
Learn more about creating Preparation Due dates from an Event.
Decedent basics
Basic information will appear in the Decedent section, along with the obituary photo for reference.
Fill out additional details like weight, height, and who remains were delivered to.

Upload ID photos in the Identification section.
Identification photos are only visible in the Care Center. They are not visible to the family.
Click through the tabbed pages to fill out the remaining Care Center fields.
These pages can also be accessed from the case menu.

Transfer
Here, you can view first call information and add in transfer details.


Next, build a list of the items collected at pickup and the action needed (e.g., disposed of, stayed with the decedent).
To do this click Add item, fill out the details, and save.
.gif?width=670&height=371&name=chrome-capture-2025-3-27%20(1).gif)
You can also print a Personal Items Record or have your staff sign for the personal items.

Click the Next button at the bottom of the page to save your work and go on to the next section.

Embalming
Here, you can create a detailed log of the body prep and embalming process.
Check Yes once you have received embalming authorization and add details, like when and who gave permission.

Use Pre-Embalming Observations to record the body's state prior to embalming.

You can also use the Body Markings chart to notate physical markers, like tattoos or scars.
Just click anywhere on the chart and add a comment.

Next, use the Embalming Procedure section to create a detailed log of the embalming process.
Record details like closures, injections, and treatments.

Under Injections, use the dropdowns to select the fluid or use the pencil icon to type in a fluid name for this case only.
You can also use the + Add option to create additional injection types for this case.

Learn more about customizing the injection fluids list.
Finally, fill out details under the Embalming Record like the embalmer's name and when it occurred.

Dressing
Use this section to describe the outfit the decedent will be buried in.

Personal Items can be added and signed for here as well.

Appearance
Add hair and cosmetic photos to show how the decedent should look for services.
On this page, you can type out details for hair, makeup, manicure, shaving, or special care needs.


Cremation
In the Cremation section, the cremation container will be listed if it's added to Goods & Services.
Use this section to also note if there is an ID tag added, or if pacemaker and jewelry are removed.

If family members are viewing the cremation, select them from the Family & Friends dropdown here.

Under Cremation Tracking, select an event to add more details.
For example, select Cremation to add the cremator name and when it occurred.
.gif?width=670&height=322&name=chrome-capture-2025-3-27%20(2).gif)
Merchandise
Once merchandise is added to the contract, it will appear in this section. This helps you and your team know which urn or casket to place the body in.
You can also add ordering details for the merchandise here.

Learn more about how to set up Care Center merchandise.
Tracking
The Tracking tab shows information from the Passare app.
Location Events History shows the chain of custody. On the right, you can see which locations were voided or selected via GPS tool.

You will also see a record of every tracking ID that the case has used and any items logged.
Click the image icon to see the item's photo(s).

Learn more about the Passare App.
Notes
Use this page to add notes about the body preparation or anything else you need.
Notify other users by typing @ and their name or role.

Learn more about using Notes.
Checklists
If you have Care Center checklists created, you will access them in the Checklist tab.

Once all items are marked as complete, the orange icon will turn green.

Learn how to create your own Care Center checklist.
Need more information?
Need help? Email us at support@passare.com or call 1-800-692-5111.