
Jump ahead to
The layout
Your everyday tools for business management are listed on the left.
This includes Dashboards, Contacts, Events, Financials, and Reports.

See section details below. Click on the underlined feature names to learn more about them.
- Dashboards will take you to your My Dashboard and Case Listing views. You will also see any custom dashboard you've created in your account.
- Contacts will direct you to the Rolodex where you can view information for People or Organizations.
- Events takes you to the Calendar where you can log and view case-related events (i.e. services, appointments) and non-case related events (i.e. vacations).
- Financials houses several features:
- Reports houses a few reporting features:
Some features are enabled by request and may not be visible to you. Contact Passare Support for help!
Next, let's take a look at the right side of the navigation menu.

See section details below. Click on the underlined feature names to learn more about them.
- Search for cases using the search bar. This improved global search lets you quickly access cases from anywhere in the system.
- Add a case using the plus icon. Simply select a case type to begin working on a case.
- Notifications are listed under the bell icon. Here, you can view notifications for Planning Center activity, note mentions, and more.
- Reminders are listed under the clock icon. Here, you can view upcoming reminders for events or tasks.
- Admin settings are accessed from the gear icon. If you have admin permissions, click this icon to update your organization's settings like Price List, Documents, Rolodex and more.
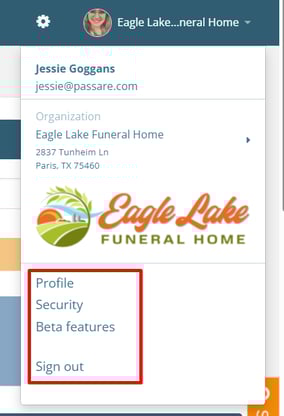
- Profile settings are located in the top right corner. This is where you can manage your profile settings and switch organizations.

From here you can also manage your profile, update a password, enable beta features, and sign out.
Organization nickname
Your organization's name is listed in the top-right corner next to your profile picture.
This will default to your funeral home name unless you create a custom Organization nickname.

Customize this text by creating a nickname under Settings gear > Organization info.
This field is useful if your staff differentiates locations with an internal name or shorthand!

Type in a nickname and save. This will update the organization's name in the top-right corner.

The organization nickname is for internal use. This name will not update on documents or be visible to families.
If you're an admin, be sure to take a look at the updated Admin settings!
Need more information?
Need help? Email us at support@passare.com or call 1-800-692-5111.